How Long Does a Home Inspection Take? An Ontario Inspector’s Honest Answer

A full home inspection on a house usually takes 2.5 to 4 hours. The house sets the clock, not the inspector’s calendar. Your offer just got accepted. Conditional on inspection, five business days. Then the listing agent texts you: “How long will your inspector need the house?” You don’t know. You’re not even sure what an inspector does for that long. And somewhere in the back of your head the clock has already started. Here’s the honest answer, from the people who do this every week. The short answer: A full home inspection on an Ontario house usually takes 2.5 to 4 hours. A condo apartment is shorter. A large or older detached home with a finished basement runs to the long end. The written report comes after the visit, and when it arrives matters as much as the inspection itself, because your condition deadline doesn’t pause while you wait. How Long Does a Home Inspection Take? The Real Range Most inspectors and most guides land on the same answer: two to four hours for a house. Kirpa’s numbers sit right inside that. Balwinder’s full home inspection runs about four hours. And two recent clients put their own times on Google: “Took 2.5 hours to inspect the whole house.” Bindusar S., Google review “The inspection took around 2.5 hours and was very thorough and detailed.” Parvinder K., Google review So which is it, two and a half or four? Both. Same inspector, same checklist, different houses. A newer house with an unfinished basement and a clear path to the furnace goes faster than an older detached with a finished basement, two bathrooms added by a previous owner, and a furnace room full of boxes. That’s the real answer. The house sets the clock. The inspector’s job is to finish the checklist, not to finish by a certain time. If you want to see what goes into those hours, here’s everything covered in a standard home inspection with Kirpa. What Makes a Home Inspection Take Longer Think of an inspection like a doctor’s physical. A healthy 25-year-old is in and out. A 70-year-old with a long file and a few new symptoms takes longer. Nobody’s doing a worse job. There’s just more to check and more to write down. Here’s what moves the clock on a house: What the house has Effect on time Why More square footage Longer More rooms, windows, outlets and taps, and every one gets checked Older home Longer Decades of renovations, older wiring and plumbing, more to photograph and explain Finished basement Longer The foundation is hidden, so the inspector hunts for signs of water behind the drywall instead of just looking at the wall A basement apartment Much longer Its own kitchen, bathroom, entrance and smoke alarms. It’s close to a second home to go through Lots of problems Longer Every defect gets photographed, described, and explained in the report An occupied, packed house Longer Boxes in front of the electrical panel, an attic hatch inside a full closet, a dog that won’t leave the basement A condo apartment Shorter No roof, attic, foundation or exterior walls of your own. Those belong to the condo corporation One note on condos, because it trips people up. The inspector checks your unit. The building’s health (the reserve fund, upcoming special assessments, lawsuits) is in the status certificate, and your real estate lawyer reviews that. It’s a separate check, and you need both. Add-ons that change the timing Mold inspection. At Kirpa it takes one to two hours. You can book it on its own or add it to the full inspection. Air sampling and third-party lab analysis are included, not billed on top. If the listing mentions a past leak, or the basement smells musty, this is the add-on worth the extra time. WETT inspection. If the house has a wood stove or wood-burning fireplace, your insurer will likely ask for one. Balwinder is WETT certified, so ask when you book whether it can happen in the same visit. Radon. This one doesn’t fit in any inspection day. Health Canada says a reliable radon test has to run at least three months. A short test can flag a problem, but only the long one tells you your home’s real level. If radon matters to you, plan to test after you move in, ideally in the heating season. What Happens During Those Hours, in Order Most inspectors work the same way: outside first while there’s daylight, then top to bottom inside. Cutaway of a two-storey house with a basement. Numbered stops show the usual order of a home inspection: 1 outside, 2 attic, 3 basement and mechanicals, 4 room by room, 5 walkthrough. How a home inspection runs Outside first while there’s daylight, then top to bottom inside. Typical house: 2.5 to 4 hours. 1 2 3 4 5 1 Outside Roof, gutters, grading, siding, decks, garage 4 Room by room Windows, outlets, taps, toilets, appliances 2 Attic Insulation, ventilation, where bath fans end 5 Walkthrough What it all means. Be there for this part. 3 Basement Foundation, furnace, water heater, panel Kirpa Home Inspection Services · Brampton, Mississauga, Toronto and the GTAThe usual route: outside, attic, basement and mechanicals, every room, then a walkthrough with you. 1. Outside. Roof, chimney, gutters and downspouts, the grading around the foundation, siding, windows from the outside, decks, the garage. 2. The attic. Insulation, ventilation, signs of leaks, and where the bathroom fans actually end. On musty-smell calls, one of the most common things Balwinder finds is a bathroom fan blowing into the attic instead of outside. 3. Basement and mechanicals. Foundation walls, the furnace, the water heater, the electrical panel, the main water shut-off, and any sign that water has been where it shouldn’t be. Finished basements get extra attention, because the drywall is exactly where moisture likes to hide. 4. Room by room. Windows and doors open and close. Outlets get tested. Every tap runs, every toilet flushes,
Frost in the Attic? Read This Before You Call a Roofer
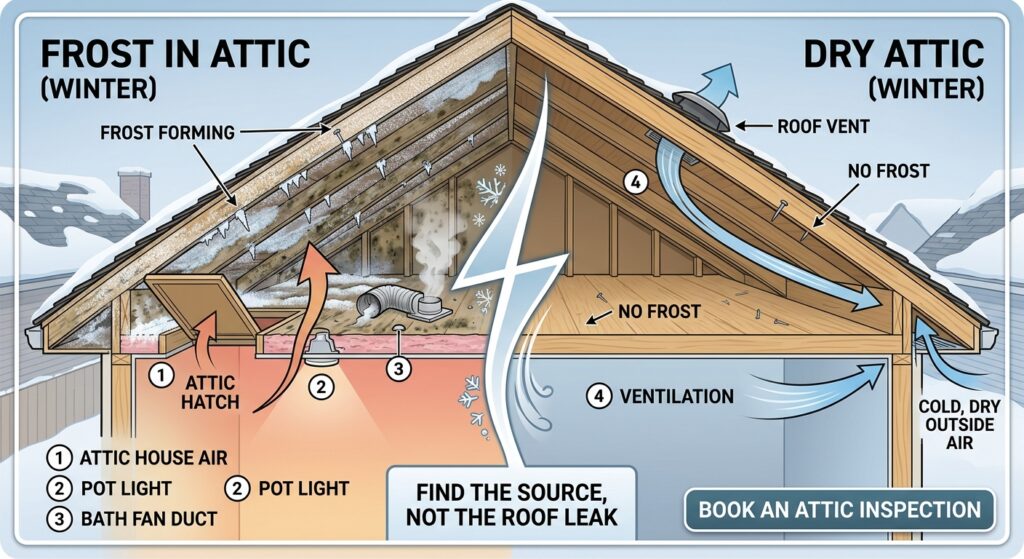
Frost forms when warm, moist house air leaks into the attic and freezes on the cold roof deck. You push open the attic hatch on a cold January morning and the underside of the roof is white. Every nail poking through the roof deck has a little cap of frost on it. Or you never look up there at all. Then in March, after the first mild week, a brown stain shows up on the bedroom ceiling. Same problem. Different month. The short answer: Frost in the attic is moisture from inside your house that got into the attic and froze on the coldest thing it could find: the underside of the roof deck and the nail tips. It’s almost never a roof problem. It’s usually a bathroom fan that ends in the attic, warm air leaking up through the ceiling, or too much humidity in the house. Fix the source, not the roof. Here’s why that matters. The stain in March looks exactly like a roof leak. So people call a roofer, and a roofer quotes a roof. What Attic Frost Actually Is Think of a cold can of pop on a hot summer day. Water beads up on the outside of the can. It didn’t leak out of the can. It came out of the air. In January, your roof deck is the can. The warm, damp air from your house is the summer day. When that air reaches the plywood under the shingles, the moisture in it condenses. Below freezing, it doesn’t bead up. It turns to frost. Nails get it first. Steel carries cold through the roof faster than wood does, so the nail tips are the coldest points in the attic. That’s why frosty nails are usually the first thing people notice. Frost builds up during long cold stretches, when it stays well below freezing for days. Then a mild day comes and it all melts at once. Why It Looks Like a Roof Leak (But Usually Isn’t) This is where most people get it wrong. When the frost melts, the water drips onto the insulation, soaks through, and shows up as a stain on the ceiling below. Sometimes it drips out of a light fixture. It really does look like the roof failed. A few clues usually point to frost, not a leak: Timing. The stain shows up after a thaw, not after a rainstorm. Summer storms do nothing. Pattern. Water shows up in lots of spots across the roof deck, not one spot under the chimney or a vent. Location. The worst of it sits over a bathroom, near the attic hatch, or above a row of pot lights. Rusty nail tips across the whole underside of the roof. A house can have frost and a roof leak, of course. That’s exactly why someone needs to look from the inside before you spend money on the outside. One more thing it’s not: an ice dam. Ice dams are ridges of ice on the outside edge of the roof, at the eaves, where heat escaping from the house melts the snow above it. Related cause, different problem, different place. The Four Ways Warm, Wet Air Gets Into Your Attic Your attic is supposed to be cold and dry, close to the temperature outside. When frost forms, something is pushing warm, wet house air into a space that was never meant to have it. Here are the four usual suspects, in the order we’d check them. The four ways warm, moist air reaches the roof deck. The numbers match the sections below. 1. A bathroom fan that ends in the attic This is the one Balwinder finds most often when a homeowner calls about a musty smell. The fan in the ceiling works fine. It just isn’t connected to anything outside. The duct has come apart, or it’s lying on top of the insulation, or it was aimed at a roof vent and never attached. So every shower blows a cloud of warm steam straight into the attic. All winter long. You can check this yourself, if your attic is safe to get into. Find the fan housing above the bathroom ceiling and follow the duct. It should run, connected the whole way, to a vent cap on the roof or an outside wall. If it stops short, you’ve probably found your frost. Ontario is clear on this one. Tarion’s construction guidelines say exhaust fans must be ducted to the exterior, as the Building Code requires, and should never end in an attic or a soffit. If your house is a new build that’s still under two years old, a fan ducted into the attic is a Tarion two-year warranty item. Get it documented before that window closes. Incorrect: the duct stops in the attic. Correct: it runs, connected the whole way, to a vent cap on the roof or an outside wall. 2. Air leaking up through the ceiling Warm air rises. In winter, your house acts a bit like a hot-air balloon, pushing warm air up and out through any hole in the top. The holes are usually small and boring: Pot lights that aren’t airtight An attic hatch with no weatherstripping Plumbing vent pipes and wiring holes that were never sealed The tops of interior walls Each one is tiny. Together, they can move a lot of moist air into the attic. 3. Too much humidity in the house If your windows are dripping on the inside in winter, your attic probably isn’t happy either. Canada’s national housing agency, CMHC, says indoor humidity shouldn’t go above 50% during the heating season, and that in very cold weather you may need 30% or lower to stop condensation on windows. A cheap hygrometer from the hardware store tells you where you stand. The usual culprits: a furnace humidifier set too high, laundry drying indoors, lots of cooking with the range hood off. Brand-new houses are a special case. The concrete and lumber keep
What Do Home Inspectors Look For?
What Do Home Inspectors Look For? A Brampton Buyer’s Room-by-Room Checklist You’ll spend about four hours standing in a house you don’t own yet, watching a stranger open panels and poke at things with a flashlight. Then he hands you a report, and you have maybe two days to decide whether to buy. So what is he actually looking at? Here’s the honest version, from the inspector’s side of the flashlight. A home inspector looks for the things that cost real money and the things that can hurt you: water where it shouldn’t be, structure that’s moving, wiring that can start a fire, heating that’s near the end of its life, and air you shouldn’t be breathing. Everything else is detail. This is the room-by-room version of that, in the order Balwinder actually walks a house in Brampton. First, What a Home Inspection Is Not A home inspection is a visual, non-invasive check of the house on the day you’re there. That one sentence explains most arguments buyers have later. Non-invasive means the inspector doesn’t open walls, lift carpet, move the seller’s furniture, or dig up the yard. If the mold is behind finished basement drywall, a standard inspection can’t see it. (More on that below, because it comes up a lot in Brampton.) On the day means it’s a snapshot. A furnace that runs fine in October can fail in January. The report tells you its age and condition, not its future. Standard inspections also don’t cover: pools and hot tubs, septic systems, underground oil tanks, wells, anything behind a locked door, and specialized testing — mold, asbestos, radon, WETT — unless you add it. Ontario doesn’t license home inspectors either. The province passed the Home Inspection Act in 2017 and never brought it into force, so “certified” means certified by somebody, and you should ask who. That’s the frame. Now the walk-through. Outside: Roof, Walls, Grading Balwinder starts outside, because the outside tells you what to look for inside. Roof. Shingle condition, how many layers, flashing around the chimney and vents, sagging along the ridge. A roof near the end of its life in Brampton is a five-figure conversation, and it’s the single most common item buyers use to negotiate. Exterior walls and windows. Brick with cracked mortar, stucco or EIFS with no drainage (common on 2000s builds), rotted window frames, caulking that’s gone. Every one of these is a water entry point. Grading and drainage. Does the ground slope toward the foundation? Do the downspouts dump water right at the wall? This is boring and it’s the number one cause of the wet basement you’ll find later. It’s also cheap to fix — which is why sellers rarely have. Garage, deck, driveway. Railings, stairs, rot in deck posts, a garage door that doesn’t auto-reverse. Safety items go in the report as safety items, not cosmetic ones. Attic: The Part Most Buyers Never See If you only read one section, read this one. Buyers almost never go into the attic. Inspectors always do. Here’s what Balwinder is checking up there: Insulation depth. Brampton homes from the 1970s–90s often have half of what the current code calls for. That’s a heating bill, not a defect, but you should know. Ventilation. Soffit vents blocked by insulation, not enough roof vents, or none at all. A poorly vented attic in a GTA winter builds frost on the underside of the roof deck. That frost melts in March. Now you have “a roof leak” that isn’t a roof leak. Bathroom exhaust fans venting into the attic instead of outside. This is the one Balwinder finds most often on musty-smell calls. Every shower pumps warm, wet air into a cold space. Within a couple of winters, there’s black staining on the sheathing above the bathroom. It looks like a roof problem. It’s a $200 duct problem that turned into a mold problem. Staining, daylight, animal activity. Water stains around the chimney and plumbing stacks, light coming through where it shouldn’t, and evidence of raccoons or squirrels. The bathroom-fan problem is the most Brampton-specific thing on this list, and it’s the one thing a buyer can check on a showing: go in the bathroom, turn the fan on, and go outside to see if air comes out of a vent on the roof or wall. If you can’t find one, ask the inspector to look for it first. Structure and Foundation Foundation walls. Cracks are normal in poured concrete; which cracks matter is the skill. Vertical hairline cracks from shrinkage are usually cosmetic. Horizontal cracks, stair-step cracks in block, or cracks with displacement (one side proud of the other) get flagged for a structural engineer. Floors and framing. Sloping floors, doors that won’t latch, cracks above door frames — signs the house has moved. Some settling in a 50-year-old house is expected. Movement that’s ongoing is a different conversation. Basement walls, finished. Here’s the frustrating part. A finished basement hides the foundation. The inspector checks what’s visible — the utility room, behind the furnace, any unfinished corner — and uses a moisture meter on the finished walls. If the meter spikes or the room smells musty, he’ll tell you, but he can’t cut the drywall. That’s where a mold inspection comes in. It’s a separate service — $450–$750 depending on how many rooms are affected, one to two hours, and the air sampling and third-party lab analysis are included in that price rather than billed on top. If the house has a finished basement and any history of water, adding it is cheap insurance. Electrical The inspector opens the panel cover. Most buyers have never seen the inside of one. He’s looking for: panel size (60-amp service in a house full of modern appliances), aluminum branch wiring (1960s–70s), knob-and-tube (pre-1950 — mostly Toronto, not Brampton, but it exists in older pockets), double-tapped breakers, scorching, open junction boxes, missing GFCI protection in kitchens and bathrooms, and reversed polarity on outlets. Two of those —
How to Hire a Mold Remediation Company in Ontario: 9 Things to Check and 5 Red Flags
How to Hire a Mold Remediation Company in Ontario: 9 Things to Check and 5 Red Flags Here’s something most people don’t know until they’re already on the phone getting quotes: Ontario doesn’t license mold remediation companies. No provincial licence. No mandatory certification. No inspector who shows up to check the work. Anyone with a van, a pressure sprayer, and a Kijiji ad can call themselves a mold remediation company tomorrow. That’s why the three quotes you got came back at $900, $3,400, and $11,000 for what sounds like the same job. It isn’t the same job. This post is about how to tell the difference before you pay for it. A mold remediation company worth hiring will test before and after with a third-party lab, put up real containment, remove porous materials instead of spraying them, explain exactly what caused the moisture, and give you everything in writing. The ones to walk away from quote over the phone, skip the testing, promise “guaranteed mold-free,” or tell you the whole house needs fogging. Why Does This Matter More Than It Should? Because a bad remediation job doesn’t look bad. It looks finished. The wall is patched, the smell is masked, and the invoice is paid. Then six months later the musty smell is back, or a buyer’s inspector opens the wall during your sale and finds growth that was painted over. Now you’re paying twice — once for the job that didn’t work, and again for the one that does. [CONFIRM — Balwinder] A specific case: a home where a previous “remediation” had been done and the growth was still there behind new drywall. Neighbourhood, what the homeowner had paid, what the air test read. Replace this box with the story as a normal paragraph. So here’s the checklist. Nine things to ask for, in the order you’ll actually need them. 1. Do They Test Before They Quote? The first question, and the one that filters out the most companies. A real remediation quote is based on a moisture reading and an air or surface sample analyzed by a lab. That tells the contractor what species they’re dealing with, how far it’s spread, and how bad the air is. Without it, they’re guessing — and a company that guesses low to win the job will “find more” once the wall is open. A company that quotes over the phone, or walks through with a flashlight and gives you a number on the spot, is quoting a job they haven’t measured. Ask: “What did the lab results show, and can I have a copy?” If you want to understand what that first visit should look like, here’s what a mold inspection consists of. 2. Will There Be a Clearance Test at the End? This is the one that separates the professionals from the sprayers. A clearance test is a second round of air sampling, after the work, sent to the same lab. It’s the only objective proof the job worked. Spore counts are back to normal, or they aren’t. A company that doesn’t do a clearance test can’t fail one. That’s usually why they skip it. Ask: “Is post-remediation testing included, and what happens if it fails?” The right answer is that they go back in at no charge. 3. Do They Find the Moisture Source — or Just the Mold? Mold is a symptom. Moisture is the disease. A remediation company that removes the growth and leaves the cause is selling you the same job again in a year. The quote should say what caused it: the bathroom fan venting into the attic, the grading sloping toward the foundation, the slow leak behind the tile. If the quote doesn’t mention water at all, they haven’t looked for it. [CONFIRM — Balwinder] Does Kirpa fix causes in-house (re-venting fans, minor leaks) or refer out? Add one sentence here saying which. Ask: “What’s causing this, and who fixes that part?” 4. What’s Their Containment Setup? Remediation without containment is just moving spores from one room into the rest of the house. Proper containment means plastic sheeting sealing off the work area, and negative air pressure — a machine that pulls air through a HEPA filter and out, so nothing escapes the zone. On a real job, you’ll see the poly walls and hear the machine running. Ask: “Do you use negative air, and can I see the setup before you start?” 5. Do They Remove, or Just Spray? Mold grows into porous materials — drywall, insulation, carpet underlay, the paper facing on batts. You can’t spray it out. Killing the surface growth and leaving the roots inside the material is why “treated” mold comes back. Porous materials with growth in them come out, bagged. Hard surfaces — framing, concrete, studs — get HEPA-vacuumed and treated, because they can actually be cleaned. A quote that’s all “antimicrobial treatment” and “encapsulation” with no removal line is a red flag on anything bigger than a small surface patch. Ask: “What’s coming out, and what’s staying?” 6. What Certification Do They Actually Hold? Since Ontario doesn’t require one, this is voluntary — which means the companies that have it went and got it on purpose. The one to look for is IICRC (Institute of Inspection, Cleaning and Restoration Certification), specifically the AMRT — Applied Microbial Remediation Technician designation. It’s the industry standard for mold work in North America. “Certified” with no letters after it means nothing. [CONFIRM — Balwinder] Kirpa’s remediation-side certification. Inspection side is InterNACHI — keep that separate; it’s an inspection credential, not a remediation one. Do not list AMRT unless it’s held. Ask: “Which certification, and who holds it — the owner or the crew doing my job?” 7. Are They Insured for This Kind of Work? General liability isn’t enough. Mold work needs pollution liability coverage, because standard contractor policies often exclude mold claims specifically. If something goes wrong — spores spread, a family member gets sick, the job damages the
9 Signs a Basement Has Flooded Before (and How to Stop Mold From Moving In)
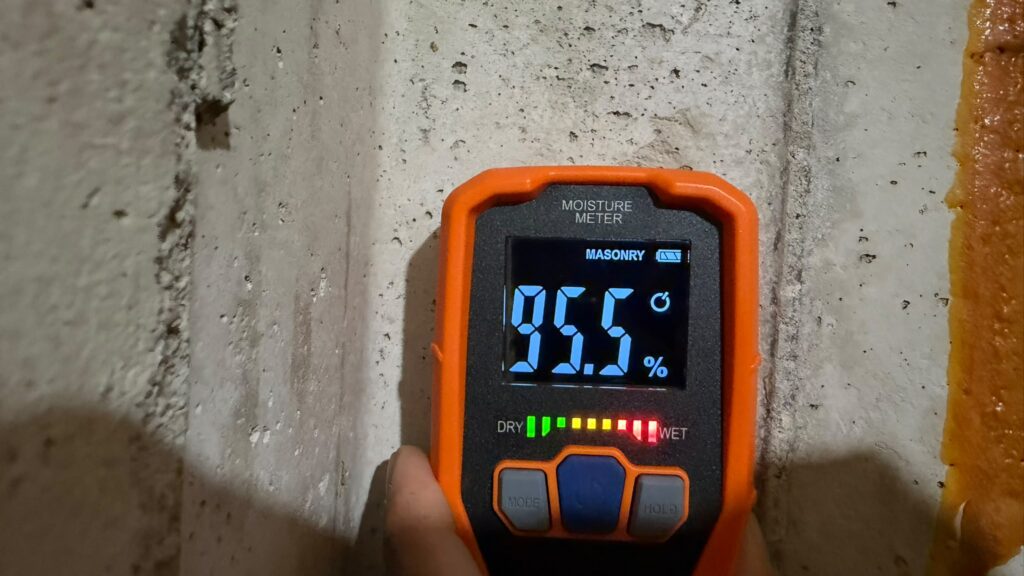
9 Signs a Basement Has Flooded Before | What to Look For 9 Signs a Basement Has Flooded Before (and How to Stop Mold From Moving In) You’re standing in the basement of a house you’re about to spend eight hundred thousand dollars on. It’s clean. It’s bright. Somebody painted recently — you can still smell it. The floor is new. There’s no water, no stain, no smell. So it’s fine, right? Maybe. Here’s the problem: a basement that flooded last spring and a basement that has never taken on a drop of water look almost identical after a weekend of work and $300 of paint. Water leaves a record, but the record is in places sellers don’t think to cover and buyers don’t think to look. This is about where that record is. Nine things you can check yourself in about ten minutes, what each one actually means, and what to do about the moisture so mold never gets started. One thing up front, because it should shape how you read the rest. Kirpa doesn’t do mold removal or waterproofing. We inspect and test, full stop — no remediation arm, no referral deal with a remediation company. So there’s no version of this where we make money by telling you a dry basement is wet. Why Nobody Is Required to Tell You In Ontario, sellers fill out a Seller Property Information Statement — and it’s voluntary. Plenty of listings don’t include one at all. Where one exists, it records what the seller says they know. That’s not a conspiracy. It’s just a thin safety net. A seller who fixed a leak six years ago may honestly believe it’s a non-issue. A seller who bought the house already finished may not know the basement ever flooded. Either way, the burden lands on you. So learn to read the room. The 9 Signs 1 The tide line Water that sits in a basement leaves a horizontal mark at the height it stopped. Not a puddle stain — a level line, running flat across a wall, a support post, or the side of the furnace. Trust the line more than the wall. Concrete and drywall get painted. The steel post in the middle of the room usually doesn’t. Crouch down. Look across the room at floor level rather than down at it — a flat line jumps out at eye level and disappears from above. 2 Rust at the base of everything metal This is the sign that survives cover-ups, because nobody repaints appliance feet. Check the bottom two inches of: the furnace cabinet and its legs, the water heater’s base ring, the washer and dryer feet, the support posts, the electrical panel’s bottom edge, any metal shelving legs. Rust rings at a consistent height across several unrelated objects is water. One rusty thing is a spill. Five rusty things all rusted to the same height is a flood. 3 Efflorescence — the white chalky stuff Look at the bare parts of the foundation wall for a white or greyish powder, sometimes crystalline, sometimes like a dusting of flour. That’s efflorescence: mineral salts left behind when water moves through the concrete and evaporates on your side of it. It doesn’t mean the basement flooded from the outside in a storm. It means water has been passing through that wall. You can brush it off with your hand. That’s actually the useful test — if it comes back later, the wall is still wet. A foundation wall on a Kirpa inspection. The meter is in masonry mode and the bar is pegged into the red. That 95.5 is the meter’s relative wet–dry scale, not 95.5% water by weight — but on masonry, pegged into the red means water is actively moving through that wall. Look past the meter at the pale chalky staining on the concrete: that’s the efflorescence. 4 Paint that stops partway up the wall Fresh paint on the bottom three or four feet of a foundation wall, older paint above it, is one of the most common tells there is. Same with a single freshly painted wall in an otherwise untouched basement. Or a patch of new drywall mud with no matching reason for it. Nobody paints the bottom half of a wall for fun. 5 Flooring that’s newer than the room New laminate in a 1985 basement. Fresh vinyl plank in one room and old carpet everywhere else. A single replaced section in the corner nearest the floor drain. Ask when it was done and why. The answer tells you a lot, including from how long it takes them to produce one. 6 Drywall that touches the floor This one runs backwards from the others, so read it carefully. When a basement is repaired properly after water, the drywall is cut and re-hung with a gap — usually half an inch to an inch above the slab — so the sheet isn’t wicking moisture up off the concrete. So: drywall sitting flat on the floor tells you either no water repair was ever done, or it was done badly. Drywall with a deliberate gap at the bottom is evidence somebody knew what they were doing — and also evidence there was a reason to do it. Pop off a section of baseboard if you can. The bottom edge of drywall is the most absorbent part of the sheet, and it’s where staining hides. 7 The sump pit tells on itself If there’s a sump pit, take the lid off and shine a light in. A water line or mineral ring inside the pit — it has run, and it’s run high. Bone dry, dusty, cobwebs, pump not plugged in — either the basement genuinely stays dry, or the pump has been dead for a year. Those are very different futures. No backup and no alarm — the pump is one power outage from being decorative. Storms cause the water and the outage at the same time. Also find
Should You Waive the Home Inspection to Win the House?
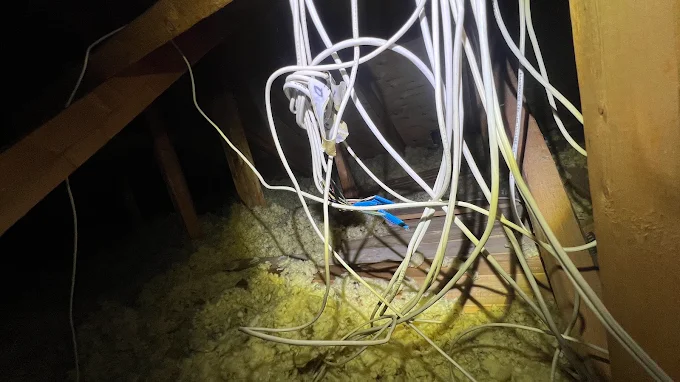
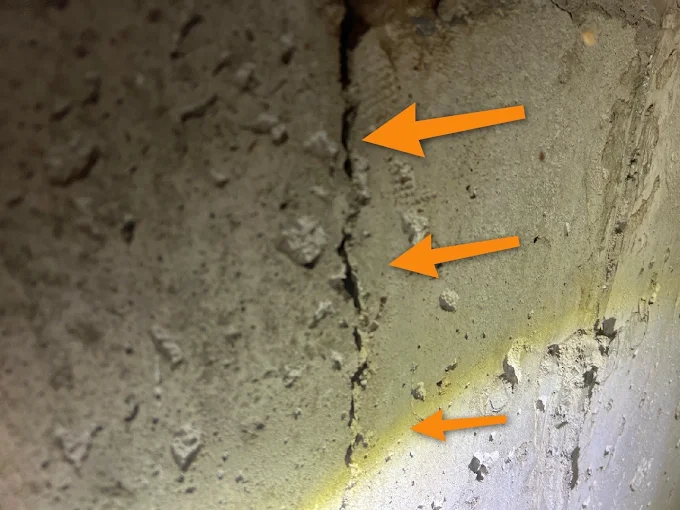
You’ve been outbid four times. The fifth house is the one. Your agent says the seller has six offers and only wants clean ones — no financing condition, no inspection condition, nothing. So you’re sitting there at 9 PM with the offer form open, wondering if the inspection is the thing you give up to finally win. Here’s the honest answer: waiving the inspection is the single most expensive way to make your offer look better. And in almost every case, there’s a way to get the same competitive offer without buying a house blind. Why So Many GTA Buyers Waive It Anyway Let’s be fair — buyers who waive aren’t being careless. They’re being squeezed. In Brampton, Mississauga and across the GTA, sellers routinely set an offer date, collect a stack of bids, and pick the cleanest one. A firm offer with no conditions beats a conditional offer at the same price almost every time. So the pressure is real. Nobody waives an inspection because they think inspections are useless. They waive it because they think it’s the price of admission. The problem is what happens after the papers are signed. What “Waiving” Actually Means in Ontario This is the part most buyers don’t get explained to them properly. Ontario runs on buyer beware. A seller has to disclose latent defects they know about — the hidden ones that make a home unsafe or unlivable. Everything else is your problem the moment you close. And the Seller Property Information Statement, the form where a seller lists known issues? It’s voluntary in Ontario. Plenty of sellers simply don’t fill one out. So when you waive the inspection, here’s the position you’ve put yourself in: No professional has looked at the house The seller wasn’t required to hand you a written history You have no report, no photos, nothing to renegotiate with You have no way out — a firm offer is firm You’re not just skipping a service. You’re giving up the only independent look anyone will ever take at the property before your money moves. This is general information, not legal advice — run the specifics past your real estate lawyer before you sign anything. The $10,000 Version of This Story One of Balwinder’s clients at Kirpa went through exactly this. Competitive listing, house they loved, and they moved fast to win it. No inspection. They got the house. A few months after closing, the drains started running slow. Then slower. Then not at all. $10,000+ Tree roots had grown into the main drain line. One system. One issue. On a house they’d already spent everything on. And that’s a cheap version of this. A foundation crack you’d never spot without knowing what to look for in a finished basement can run into tens of thousands. So can a furnace at the end of its life, aluminum wiring, or a roof with two years left on it. Found on a Kirpa inspection. A vertical crack running down a foundation wall, with staining and crumbling concrete at the base. Finish that basement and drywall over it and this disappears completely — which is exactly why buyers who waive never see it. The inspection didn’t cost them money. Skipping it did. The Three Things That Cost the Most When Nobody Looks Across GTA inspections, the expensive surprises cluster in the same places: 1. Water where it shouldn’t be Behind finished basement drywall, under bathroom floors, around foundation cracks. A finished basement is a beautiful place to hide a moisture problem, which is why we run a thermal camera through every inspection — it picks up moisture behind walls that a visual check alone would walk right past. 2. Systems at the end of their life A furnace, roof or water heater doesn’t fail loudly on closing day. It fails in year two. Knowing you’re inheriting a 22-year-old furnace changes what the house is worth to you before you bid, not after. 3. Work that was never permitted This one is very Brampton. Basement apartments, converted garages, added bathrooms — a lot of it done well, some of it done by whoever was cheapest, and a fair amount of it never inspected by anyone. That’s fine right up until an insurer or the city asks a question. Also found on a Kirpa inspection. A bundle of cables joined together in an attic, sitting in loose insulation. You will never see this from the living room, and it does not show up on a listing photo. None of these are exotic. All of them are visible to someone who spends four hours in the house knowing where to look. The Better Move: Get It Inspected Before You Bid Here’s the part nobody tells first-time buyers, and it’s the single most useful thing in this post. You do not have to choose between “inspection condition” and “no inspection.” There’s a third option: inspect the house before the offer date, then submit a firm offer with confidence. You book an inspector for the showing window. They walk the property, look at the major systems, and tell you what they found. Then you write your offer knowing what you’re buying. Your offer is still clean. The seller still sees no conditions. But you’re not guessing. Talk to your agent about arranging access during the showing period — most listing agents will accommodate it, especially if there’s an offer date and they want serious bids. And ask your inspector directly what they can do inside a pre-offer window; scope and pricing for a pre-offer look aren’t the same as a full four-hour inspection, so get that clear up front. If you win, you can still bring the inspector back for the full roof-to-foundation report. Your Three Options, Side by Side Your Move How the Seller Sees It What You Know Verdict Waive the inspection Clean, firm offer — most competitive Nothing. No report, no photos, no way out. Avoid Inspect before you bid Clean, firm offer
What Does a Mold Inspection Consist Of?
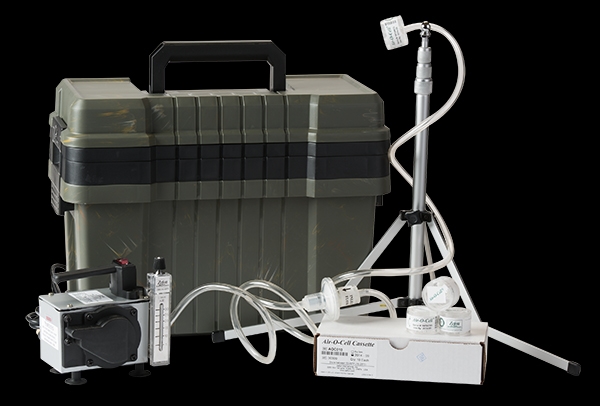
You keep smelling it. Somewhere near the laundry room, or the back corner of the basement, or the upstairs hallway. Musty. Damp. Like a cottage that’s been closed up all winter. You’ve looked. You moved the boxes, checked under the sink, pulled the washer out. Nothing. No black spots, no green fuzz, no water on the floor. So now what? You’re being asked to pay a few hundred dollars for someone to come look at a house you already looked at. Fair question: what are they actually going to do that you didn’t? Here’s the honest answer. The air sampling kit that comes to every Kirpa mold inspection — pump, flow meter, tripod-mounted collection head, and lab cassettes. What a Mold Inspection Consists Of A mold inspection consists of four parts: an interview about the home’s moisture history, a visual inspection of high-risk areas, moisture and humidity readings using meters and thermal imaging, and air sampling sent to a lab. It ends with a written report identifying where moisture is coming from and what needs to be repaired. That’s the short version. The part that matters is what happens inside each of those steps, because that’s where a real inspection separates from a fast one. First: Do You Even Need to Hire Someone? Not every patch of mold needs a professional. Anyone who tells you otherwise is selling something. Toronto Public Health, working from CMHC guidance, uses area as the deciding line: Size of the affected area What to do Under 1 m² Clean it yourself with unscented detergent, gloves, a mask, and eye protection. Dry it thoroughly afterward. Up to 3 m² Still manageable by a homeowner, but take real precautions. 4 m² or larger Bring in someone trained in remediation. One square metre is roughly the size of a bath towel laid flat. If you found a patch that size behind the toilet, clean it and fix whatever’s wetting it. You don’t need an inspector for that. But those numbers only apply to mold you can see. That’s the catch, and it’s the reason you’re reading this page. A musty smell with no visible source isn’t a small-area problem or a large-area problem. It’s an unknown-area problem. You can’t measure what you can’t find, and the growth causing that smell is usually somewhere you physically cannot look — inside a wall cavity, above a ceiling, under flooring, or in the attic. That’s what the inspection is for. Not to confirm the obvious. To find the part you can’t reach. What Actually Happens During the Visit It starts with questions, not equipment Before anything gets switched on, a good inspector asks about the house’s history. Any roof leaks? Basement ever take on water? Old plumbing failure, dishwasher overflow, washing machine hose let go? Windows sweat in the winter? Did a previous owner mention anything? This isn’t small talk. Water travels. A leak that happened three years ago in a spot that’s dry now can still be feeding growth two rooms over. Skipping this conversation means searching a whole house blind instead of starting where the evidence points. Then the walkthrough The visual inspection covers the places moisture collects: basement corners and rim joists, under kitchen and bathroom sinks, around window frames, behind toilets and tubs, laundry areas, attic sheathing, HVAC vents and ductwork, and any ceiling underneath a bathroom. What’s being looked for isn’t just mold. It’s the evidence that mold is likely: Staining or discolouration Bubbling or peeling paint Swollen baseboards or soft drywall Cracked, missing, or separated caulking Rust on fasteners and fittings Condensation on windows, pipes, or cold walls Wet or compressed insulation A wall can look perfect and still be soaked inside. Paint hides a lot. That’s why the walkthrough is only step one. Then the readings This is the part most homeowners have never seen, and it’s the part that separates a real mold inspection from a glance around the basement. Moisture meter. Pressed against walls, floors, and ceilings, it reads how much moisture is actually inside the material. It catches wet drywall weeks or months before anything appears on the surface. Balwinder runs it across every suspect surface, not just the ones that look wrong. Thermal imaging camera. It reads surface temperature, and wet material holds temperature differently than dry material. So a cold patch in the middle of a warm wall becomes a flag worth checking. Important: the camera does not see through walls, and it cannot see mold. Anyone who tells you their camera detects mold is overselling it. It shows you where to point the moisture meter next. Hygrometer. Measures relative humidity room by room. Most Canadian homes sit comfortably between 30% and 50%. A basement holding 65% all summer doesn’t have a mold problem yet — it has the conditions to grow one, which is worth knowing before it happens. If you want the longer version of why tools and time matter this much, Kirpa’s breakdown of what separates a basic inspection from a thorough one covers it. The short version: an inspector who’s out the door in 45 minutes did not take moisture readings. There isn’t time. Then the air sampling Air samples get taken indoors, along with a control sample from outside the house. Both go to a third-party lab. The outdoor sample matters more than people expect. Mold spores exist everywhere — in your yard, in the park, in every building you walk into. A lab result showing spores in your living room means nothing on its own. It only means something compared against what’s normally floating around outside your front door. The sampler runs on a tripod at breathing height, pulling a measured volume of air through a collection plate that goes to the lab. At Kirpa, sampling happens on every mold inspection. It’s built into the price rather than pitched on site as an extra, which means there’s no upsell conversation while someone’s standing in your basement, and no lab invoice showing up
How to Choose a Home Inspector in Ontario

Inspector How to Pick a Good Home Inspector: What Homebuyers Should Look For Here’s something most Brampton buyers find out too late: In Ontario, anyone can call themselves a home inspector. There is no provincial licence. No mandatory exam. No required training. A person who finished a weekend course last month and a person who has inspected 2,000 homes can print the exact same business card. That’s the whole problem. You’re about to spend $700,000 or more on a house, and the one person you’re trusting to tell you whether it’s safe comes from an industry with no gatekeeper. So the responsibility falls on you. Here’s exactly what to check before you book. 0 Homes Inspected 0 Quality Customers 0 5 Star reviews Here is what you should look for. Home inspection is not a regulated profession in Ontario, and there is no government licence for it. The province passed legislation to license inspectors in 2017, but it was never brought into force. That means credentials, insurance, and experience are voluntary, and it’s on the buyer to verify them. Check Credentials, Because Nobody Else Will These are the ones that matter in Ontario: • OAHI (Ontario Association of Home Inspectors) – The RHI designation (Registered Home Inspector) is one of the strongest voluntary credentials in the province. • CAHPI (Canadian Association of Home and Property Inspectors) – National association with peer-review standards. • InterNACHI – International association requiring continuing education and adherence to a code of ethics. Ask which certifications they have? For the record, at Kirpa Home Inspection Services is InterNACHI Certified, and you can verify that yourself. Ask How Long the Inspection Takes A proper inspection of a detached home typically takes between 2 and 3 hours. Anything significantly shorter usually means corners are being cut. A thorough inspection covers: • Roof • Attic • Foundation • Electrical • Plumbing • HVAC • Windows and doors • Garage • Basement • Exterior Ask What Tools They Bring Professional inspectors should use more than just a flashlight. Important tools include: • Thermal Imaging Camera • Moisture Meter • Drone (for roofs that can’t be safely accessed) These tools help identify hidden moisture, insulation issues, leaks, and roof defects that aren’t visible during a visual inspection. Ask About Insurance Before You Ask About Price Two types of insurance matter: • Errors & Omissions (E&O) Insurance – Protects you if something significant is missed. • General Liability Insurance – Covers accidental damage during the inspection. Always ask for proof. A professional inspector won’t hesitate to provide it. Book Your Home Inspection? Book an Inspection
Should Inspection in a Brand New Home in Ontario?

Brand New Doesn’t Mean Defect-Free: Why New Ontario Homes Still Need an Inspection TL;DR Brand new doesn’t mean built right. In Ontario, new builds regularly get handed over with deficiencies the builder’s own walkthrough never catches — regardless of how polished the home looks on closing day. If you just took possession or you’re about to, your window to document problems is short and the clock is already running. Miss it and the repairs come out of your pocket. Kirpa Home Inspection works with homeowners across the GTA on new-build and pre-delivery inspections — plain findings, photo documentation, no scare tactics. Book an inspection here. What’s Actually Wrong Inside a Brand New Home Most people assume brand new means brand perfect. It’s a reasonable assumption. Here’s what actually happens on a modern construction site. A single house passes through dozens of trades on a compressed schedule. Framers, roofers, HVAC crews, electricians, drywallers, and finishers all work against deadlines, and each one covers up the work of the trade before them. By the time the drywall goes on and the paint goes up, most of the house is hidden. When Kirpa inspectors walk through brand new homes across the GTA, here’s what turns up regularly: Bathroom exhaust fans venting into the attic instead of outside — one of the most common new-build defects in Ontario, and a direct path to attic moisture and mould Attic insulation shortfalls — insulation blown short of the target depth, pushed away from the eaves, or missing baffles at the soffits Disconnected or crushed ductwork in joist spaces, plus missing dampers — the reason one bedroom is always cold Grading that slopes toward the foundation, and downspouts discharging right against the wall Electrical issues — reversed polarity, open grounds, missing GFCI or AFCI protection at required locations Roof and flashing defects — unsealed penetrations, sloppy valley work, exposed fasteners Plumbing leaks that only appear under use — loose supply connections, unsealed penetrations, poorly seated toilet flanges Engineered floor joists notched or drilled by trades to run pipe or wire, which quietly compromises the member The living space looks immaculate. Freshly painted, move-in ready, spotless. So when homeowners find out the attic has been collecting moisture since day one, it’s almost always a shock. What Ontario Builders Are Required to Do (And What Actually Happens) Here’s something most new homeowners don’t fully understand. Before you take possession, your builder walks you through the home for a Pre-Delivery Inspection (PDI). The PDI form you sign becomes the baseline for every warranty claim that follows. Anything not documented there or in your later warranty submissions gets much harder to argue — because once your furniture is in, the builder can reasonably say the movers did it. Your Tarion coverage runs in three windows that start on your possession date: one year for workmanship and materials, two years for water penetration and the building’s major systems, and seven years for major structural defects. For homes with a warranty start date on or after May 1, 2024, claims run through Tarion’s MyHome portal, which submits your running list of items automatically at three points: an initial submission at roughly the 40-day mark a mid-year submission around six months a year-end submission in the last 30 days of the first year, with a short grace period after So does the PDI protect you? Partly. But a builder rep walking you through a house in 60 to 90 minutes, with you focused on paint scuffs and cabinet finishes, is not a technical inspection. Nobody is pulling the attic hatch. Nobody is checking whether the bath fan ductwork actually terminates outside. The PDI requirement exists. Whether it caught anything meaningful is a different question. So Should You Get an Inspection on a Brand New Home? Yes — especially in Ontario, and especially inside that first year. Here’s why it matters more than most people realize. Your warranty is only as good as the list you submit. Tarion doesn’t go looking for defects on your behalf; it responds to what you report, within the windows you’re given. A defect nobody identified in year one becomes a repair you pay for in year three. An independent inspection turns “the house seems fine” into a documented, photographed list you can submit while coverage is still open. That’s the whole value: not fear, just evidence, filed on time. The Smartest Move Most First-Time Buyers Miss If you haven’t closed yet, here’s a tactic most first-time GTA buyers never think to use. Bring your own inspector to the PDI. You’re allowed to have someone accompany you, and a trained inspector will find things in that walkthrough that you won’t. Confirm the arrangement with your builder ahead of time, and give the inspector the appointment details in advance. If you’ve already closed, you’re past that window — but you are nowhere near out of options. The strongest move is a full inspection timed a few months into your first year, well before the year-end submission closes. That gives you a documented list to file and leaves the builder time to respond while the warranty is still live. Either way, put the deadlines in your calendar the day you get the keys. The most expensive new-home mistake in Ontario isn’t a defect — it’s a defect discovered in month fourteen. What About Cost — Is It Worth It in Year One? Brand new homeowners are usually stretched thin. Down payment, closing costs, moving expenses — by the time you get the keys, the budget is tight. So is an inspection worth it right away? Weigh it against what a single missed item costs. Re-ducting bathroom exhaust fans, topping up attic insulation, correcting grading, or repairing water damage from an unsealed penetration all run well past the price of an inspection. Inside the warranty window, those repairs are the builder’s responsibility. Outside it, they’re yours. If you’re unsure, ask what the inspection actually covers before you book, and ask to see
What Is an 11th Month Warranty Inspection?

An 11th month warranty inspection is a full, top-to-bottom check of your new home done near the end of your first year of ownership — before your one-year builder warranty expires. An independent, certified inspector goes through the whole house: roof, attic, foundation, structure, plumbing, electrical, HVAC, windows, doors, and finishes. They document every defect with photos and put it in a written report. You then hand that report to your builder so they fix the problems while they’re still responsible for them. Think of it as the final exam for your new home. You get one shot to hold the builder accountable, and this is it. The name trips people up, so let’s be clear: it’s called the “11th month” inspection because you book it around the 10th or 11th month — not the 12th. You need the buffer. More on that below. Tarion Warranty Home Inspections People assume a brand-new home is a defect-free home. It isn’t. Not even close. Here’s the honest reason, from someone who inspects these houses for a living: builders rush. New subdivisions go up fast, crews are stretched thin, and corners get cut. Not out of malice — just speed. And the mistakes that come from rushing don’t always show up on move-in day. They show up over the first year, once the house has been through a full cycle of Ontario winter and summer. The ground shifts. Materials expand and contract. Caulking shrinks. Seasonal weather pushes on the building and exposes what the crew missed. That’s why month 11 is the sweet spot — the house has had time to show its flaws, but you still have warranty left to force the fix. Miss the window, and a small documented defect becomes a large out-of-pocket repair. The Real Ontario Timeline: How Tarion Actually Works This is where every other article online falls apart. Most “11 month inspection” guides are written for the U.S. and just name-drop Tarion once. Here’s how it really works in Ontario. If you bought a newly built home or condo in Ontario, your builder’s warranty is backed by the Tarion Warranty Corporation. During your first year of possession, there are three critical windows you need to know about: The Year-End Form is the big one, and it’s the reason the 11th month inspection exists. You want a professional inspection report in hand before you fill out that form, so your submission is complete, specific, and backed by photos instead of a vague list of things you sort of noticed. Here’s the trap: your one-year warranty runs from your date of possession, not from when your house was finished or when you signed. Know your possession date. That’s your deadline. What an Inspector Actually Finds in GTA New Builds Let me get specific, because this is what separates a real inspection from a checklist someone copied off the internet. These are the defects I keep finding on new homes across Brampton and the GTA. Bathroom exhaust fans venting into the attic This is the one I find most. The exhaust fan is supposed to duct all that warm, moist bathroom air outside the home. On rushed builds, the duct gets left dumping straight into the attic instead. I inspected a townhouse near Mount Pleasant where the attic was already growing mould at the 10-month mark. Every hot shower had been pumping moisture up there for months. That’s a mould remediation bill and a ventilation fix — the kind of thing that’s the builder’s problem in month 11 and your problem in month 13. Windows that were never sealed properly When crews rush, sealing gets sloppy. I find windows that aren’t sealed correctly all the time — gaps that let air and water sneak in. You don’t notice until you’re paying to heat air that’s leaking straight out, or until moisture starts working its way into the wall. Missing attic insulation It sounds impossible, but it happens: the attic insulation just doesn’t get installed, or gets installed with big gaps. On a fast-moving build, someone assumes another crew handled it, and nobody did. You feel it as cold rooms and high heating bills long before you’d ever think to climb into the attic and check. Foundation leaks New foundations settle, and settling plus poor grading or waterproofing equals water finding its way in. A foundation leak caught at month 11 is a warranty claim. The same leak caught at month 18 is thousands of dollars and a very stressful basement. None of these are exotic. They’re common, they’re missable by a regular homeowner, and they’re all covered — if you document them in time. What Happens After the Inspection This is the whole point, and it’s simpler than people fear. Once your inspection is done, you get a detailed report with photos of every issue found. You take that report back to your builder. Because it’s documented, specific, and inside the warranty window, the builder repairs it — while it’s still their responsibility and their cost. Most reputable builders would rather fix a documented issue now than deal with an angry owner and a possible dispute after the warranty is gone. Your job is to make sure the issues are on paper, on time. A professional report does exactly that. New construction is the whole reason this inspection exists — if you want to understand the full scope of what a new-build check covers, that’s the new construction inspection service to look at. When Should You Book Your 11th Month Inspection? Book it in your 10th or early 11th month of possession. Not month 12. Here’s why the buffer matters: If you wait until the last two weeks, you’re gambling. Some repairs take time to arrange, and a late submission can leave you fighting a deadline you can’t win. Booking early costs you nothing and protects everything. Pull out your possession paperwork, find your exact date, count back about six to eight weeks, and book around there. Who Should Do the Inspection? Not the builder. An independent, certified home inspector — someone whose only job is to represent you,